

I've received questions about how to install Home Assistant in Unraid as well as what the best method to install it is. I hope this post answers these questions and points people in the right direction.
What is the best way?
You can run Home Assistant in a VM or in a Docker container. I recommend using a Docker container because it uses less resources and is easier to maintain over the long-run (updating containers in Unraid is super easy). For these reasons this post is focused on running HA in a container.
I only recommend running HA under a VM in Unraid if you have some sort of specific circumstance that requires it (I can't really think of one right now, but I am sure some people have them).
Unraid Community Applications
The easiest way to install Home Assistant's Docker container in Unraid is to use Community Applications. If you haven't installed Community Applications in Unraid I highly recommend it as it makes installing tons of software in Unraid much easier by giving you templates for various containers so you don't have to fill everything out manually. If you need to install Community Applications follow the tutorial here.
Installing Home Assistant
Now that we have Community Applications installing Home Assistant is as easy as clicking the "APPS" tab and searching Home Assistant and clicking install. This will bring up the container configuration page so you can change settings before starting.
Before you start the container there is a couple things we need to change. We want to add the environmental variable TZ to the container so that the container uses the correct timezone. If this variable is not defined the container will most likely use the wrong timezone (containers don't use the host system's timezone so you can pass this variable to any container to set the correct one). To add this variable just press "Add another Path, Port, Variable, Label or Device" add the bottom of the page and fill it out like this (changing the value to whatever timezone you are in):
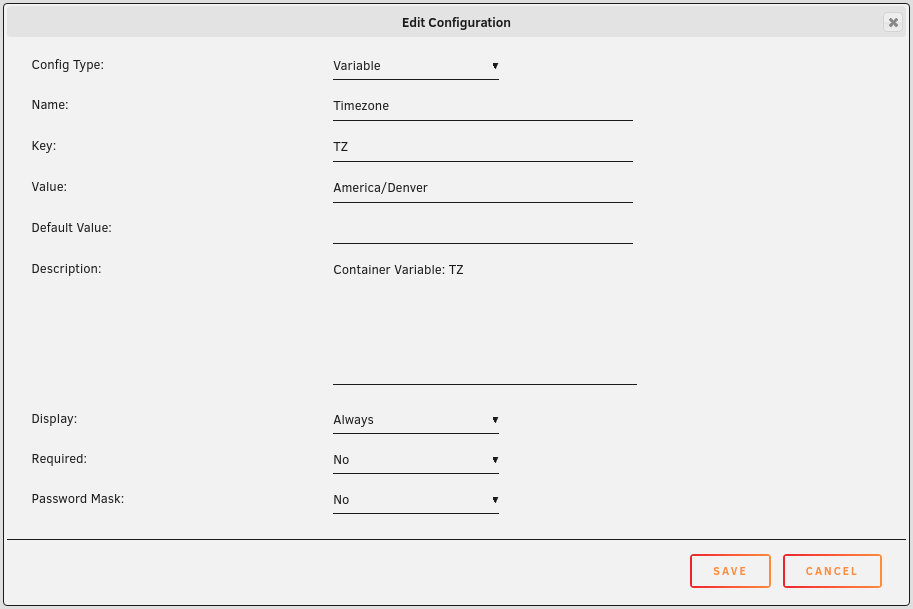
If you need a list of valid timezones you can easily find them on this page. Press save after adding this variable. Next we want to specify the container to only pull the latest stable image. If we do not specify a tag (or we specify the tag latest) it will always pull the latest container image created which can be images that aren't stable (dev and beta images). If you want to read more about the problem of using the latest tag see this link. To fix this problem we just change the repository to homeassistant/home-assistant:stable and now we will only get stable releases.
Now press apply at the bottom of the page to start the container. You should now be able to access Home Assistant by hitting port 8123 on your Unraid server's IP. If you have a database server running in a container you may want to add the TZ variable to that as well so both the database and HA are using the same timezone.
Updating Home Assistant
If an update is available it will show next to the container. Here is an example of what it looks like:

Before applying updates it is good practice to go to the Home Assistant releases page and see if any of the updates have breaking changes that apply to us and if so fix them before updating. Once that is done hit apply update and Unraid will handle everything from there (make sure not to close the window or dialog until it finishes otherwise it wont complete).
Viewing Logs
There is a log button to the far right on the docker container list in Unraid that lets you quickly view the log output of the container. There is also a log file called home-assistant.log in the Home Assistant config directory that will contain more lines then the quick Unraid log view.
Reduce Logging
By default Home Assistant logs pretty much everything. This can get a little insane (especially with a lot of entities) so I recommending tuning it back using this in your configuration.yaml file:
logger:
  default: warning
This will only display warnings and above (so warnings and errors). This should help keep your log files from filling up too crazy.
Using MySQL
Home Assistant uses SQLite out of the box since it doesn't require a database server to be running. I only recommend using MySQL with HA if you know how to use MySQL already.
I don't really like SQLite that ships with Home Assistant and so I setup HA to store data in MySQL instead. I've had too many corruption issues with SQLite with various programs and I have a lot of experience with MySQL and already have my server setup to backup all my MySQL databases regularly (if things get corrupt I will just pull from backup).
If you already have a server setup with a database created for Home Assistant you can easily set HA to use it by setting the recorder in configuration.yaml to something like this:
recorder:
  purge_interval: 1
  purge_keep_days: 7
  db_url: mysql://<username>:<password>@<host>/<database>?charset=utf8
The purge_interval and purge_keep_days will delete data from HA's MySQL database after it is 7 days old and will do that every day. Change these to whatever you want. I like these settings since it keeps the MySQL database running smoothly and I have all my data in InfluxDB anyways if I need to go further back than 7 days.
There are also other supported databases. You can check all the supported database types by looking at the recorder integration page.
Networking
One thing to note is that you will want to figure out how you want to setup your container networking before you start creating containers all willy-nilly. Containers setup in bridge mode cannot communicate with containers in custom mode (custom mode is if you want to give the container a static IP address). If you need containers to be able to communicate with each other you should throw them all under bridge / host mode or put them all under custom mode with their own IPs.
Conclusion
And that is it! Containers make installing software so much easier (since they are bundled with everything they need to run) that there really isn't a whole lot to it. Once you install various containers you should start getting the hang of how it works.
If I didn't cover something in this post or you have any questions/feedback feel free to leave a comment below and I will get back to you. I really enjoy hearing back from my readers. :)