

I recently set up my Wall-mounted Amazon Fire Tablet running WallPanel to voice when any of the doors to the house open/close (including my garage door) and has actually been really helpful. In this post I will show you how I accomplished this with Home Assistant, Node-RED, and a tablet (or any android device) running the WallPanel app.
This isn't just for doors. You can make the tablet say anything with text-to-speech via Node-RED. The possibilities are pretty endless. One I am thinking about setting up is a voice notification when I leave work and my wife is home.
Getting Started
You will need an Android device with WallPanel installed. I cover that in my post Wall mounted tablet running Home Assistant. Make sure to enable MQTT or HTTP depending on how you will be using Node-RED to communicate with the tablet. For my setup the tablet was very slow responding to MQTT commands but HTTP commands were near instant so I went that route. The Node-RED flows I will share will use HTTP but you can easily switch it to MQTT if you want (if you need any help with this feel free to leave a comment below).
Once that is setup I recommend setting a static IP address for your tablet. You could also use a hostname (I prefer just setting a static IP for stuff like this). If you don't know how to set a static IP on the tablet just Google it (it's super easy to do).
You also need Node-RED and Home Assistant setup to communicate with each other via the module node-red-contrib-home-assistant-websocket in Node-RED. If you haven't done that yet here is a post I made about it.
Test Flow
First we need to make sure that our tablet is getting events. Here is a flow to test that your tablet is getting voice commands (Modify the HTTP request block to match the IP address of the tablet):
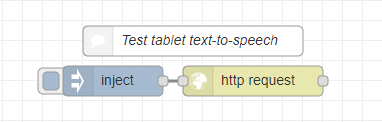
[{"id":"1e323c25.ba15f4","type":"http request","z":"abb0e85e.707e08","name":"","method":"POST","ret":"txt","paytoqs":false,"url":"http://192.168.1.58:2971/api/command","tls":"","proxy":"","authType":"","x":1930,"y":1380,"wires":[[]]},{"id":"3fc66e8d.e8e3f2","type":"inject","z":"abb0e85e.707e08","name":"","topic":"","payload":"{\"speak\":\"API text to speech is working! Yay!\",\"volume\":100}","payloadType":"json","repeat":"","crontab":"","once":false,"onceDelay":0.1,"x":1790,"y":1380,"wires":[["1e323c25.ba15f4"]]},{"id":"19f3b1d5.2396ce","type":"comment","z":"abb0e85e.707e08","name":"Test tablet text-to-speech","info":"","x":1870,"y":1340,"wires":[]}]Once that is imported press the little box to the left of the Inject node to send off the test payload. Once it is sent you should hear your tablet speak. If you do not hear anything then you will need to go and double check your IP address and port is correct (also verify the speakers on the tablet are working). It should be pretty easy to figure out but if you have issues feel free to leave a comment below and I will help you figure it out.
Actual Flow
Now that we know Node-RED and the tablet communicate successfully we can build our flow for speaking door events (or whatever entity you want to track if you are using this for something else). Here is what I am using to voice my door events:
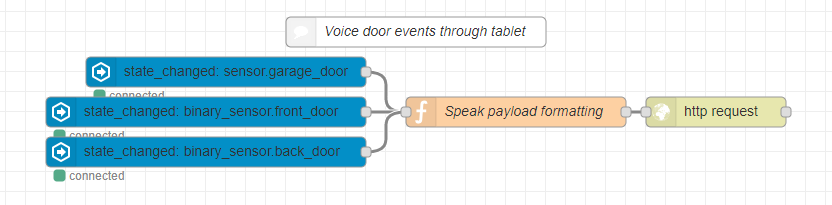
[{"id":"1e323c25.ba15f4","type":"http request","z":"abb0e85e.707e08","name":"","method":"POST","ret":"txt","paytoqs":false,"url":"http://192.168.1.58:2971/api/command","tls":"","proxy":"","authType":"","x":1950,"y":1360,"wires":[[]]},{"id":"19f3b1d5.2396ce","type":"comment","z":"abb0e85e.707e08","name":"Voice door events through tablet","info":"","x":1650,"y":1280,"wires":[]},{"id":"e5bb0d69.8bf46","type":"function","z":"abb0e85e.707e08","name":"Speak payload formatting","func":"var entityName = msg.topic.split(\".\")[1].replace(new RegExp('_', 'g'), \" \");\n\nif(msg.payload != 'unavailable' && (typeof msg.data.old_state !== 'undefined' ? msg.data.old_state.state != 'unavailable' : true)) {\n msg.payload = {\n \"speak\": entityName + \" \" + (['on', 'open'].indexOf(msg.payload) > -1 ? 'Open' : 'Closed'),\n \"volume\": 100\n };\n node.status({\n fill: \"green\",\n shape: \"dot\",\n text: msg.payload + \" at \" + (new Date()).toLocaleString()\n });\n \n return msg;\n}\n\n","outputs":1,"noerr":0,"x":1750,"y":1360,"wires":[["1e323c25.ba15f4"]]},{"id":"2c111428.b4b5cc","type":"server-state-changed","z":"abb0e85e.707e08","name":"","server":"233a9c63.e2baf4","version":1,"entityidfilter":"sensor.garage_door","entityidfiltertype":"exact","outputinitially":false,"state_type":"str","haltifstate":"","halt_if_type":"str","halt_if_compare":"is","outputs":1,"output_only_on_state_change":true,"x":1460,"y":1320,"wires":[["e5bb0d69.8bf46"]]},{"id":"3fe0e43e.2b474c","type":"server-state-changed","z":"abb0e85e.707e08","name":"","server":"233a9c63.e2baf4","version":1,"entityidfilter":"binary_sensor.front_door","entityidfiltertype":"exact","outputinitially":false,"state_type":"str","haltifstate":"","halt_if_type":"str","halt_if_compare":"is","outputs":1,"output_only_on_state_change":true,"x":1440,"y":1360,"wires":[["e5bb0d69.8bf46"]]},{"id":"9f4da5ed.841b58","type":"server-state-changed","z":"abb0e85e.707e08","name":"","server":"233a9c63.e2baf4","version":1,"entityidfilter":"binary_sensor.back_door","entityidfiltertype":"exact","outputinitially":false,"state_type":"str","haltifstate":"","halt_if_type":"str","halt_if_compare":"is","outputs":1,"output_only_on_state_change":true,"x":1440,"y":1400,"wires":[["e5bb0d69.8bf46"]]},{"id":"233a9c63.e2baf4","type":"server","z":"","name":"Home Assistant","legacy":false,"hassio":false,"rejectUnauthorizedCerts":true,"ha_boolean":"y|yes|true|on|home|open","connectionDelay":true}]I have each of the entities I want to trigger the voice feed into the "Speak payload formatting" function block that handles converting the payload into text for the tablet. Since this is for doors I have the message parse the entity payload and say Open or Closed depending on the value of the sensor (some binary sensors say "on" and "off" instead of "open" and "closed"). I also put the entity's name in the spoken message. It just parses the name from the entity id (example: binary_sensor.front_door would say "Front Door Open" since it converts underscores to spaces and drops the entity's domain).
And that is it! It's a super short flow that is very easy to modify to do whatever you want. I've also set it up to voice alarm events (such as telling the user they have 60 seconds to leave when they arm the alarm).
Going Further
If you want to go further you can add an input_boolean sensor that you can use to enable/disable voiced events from the Home Assistant UI. I usually add one for every one of my automations so it is super easy to turn them off without opening Node-RED.
Another thing you could do is only voice events if someone is home. This way if someone breaks in and you have sensitive voice events (such as saying when you leave work or something) these wont get voiced to the robber.
If you have any other neat ideas for how to use this feel free to leave a comment below. I love hearing about other ideas people come up with.
Conclusion
At first my wife and me thought this may get annoying but it actually is quite helpful. My garage door has an issue every now and then that prevents it from closing. It's pretty rare but I still don't like leaving my garage open so I would wait for it to close before coming into the house. Now I don't have to wait anymore and just come inside and wait for the tablet to tell me the garage door closed. It also makes my wife and me feel safer.
I got the idea from visiting a friend's house that had a security system that announced certain sensor changes (such as doors or windows opening) and displayed the sensor states on a small touchscreen display. I wanted to mimic the same behavior in my own setup and it was surprisingly easy to accomplish.
I hope others find this helpful. If you have any feedback, questions, or ideas please feel free to leave it below :)